1. Login via Putty to access the server via SSH: https://clients.activeservers.in/knowledgebase/257/How-to-Connect-to-a-Linux-Server-Using-PuTTY-Step-by-Step-Guide.html
2. Update the Server:
sudo yum update –y

3. Install a Web Server:
https://clients.activeservers.in/knowledgebase/283/How-to-Install-Apache-in-Linux-Server.html
4. Install PHP and Extensions:
- WordPress requires PHP. Install it with:
sudo yum install php php-mysqlnd php-curl php-gd php-mbstring php-xml php-xmlrpc –y

5. Install and Configure MySQL:
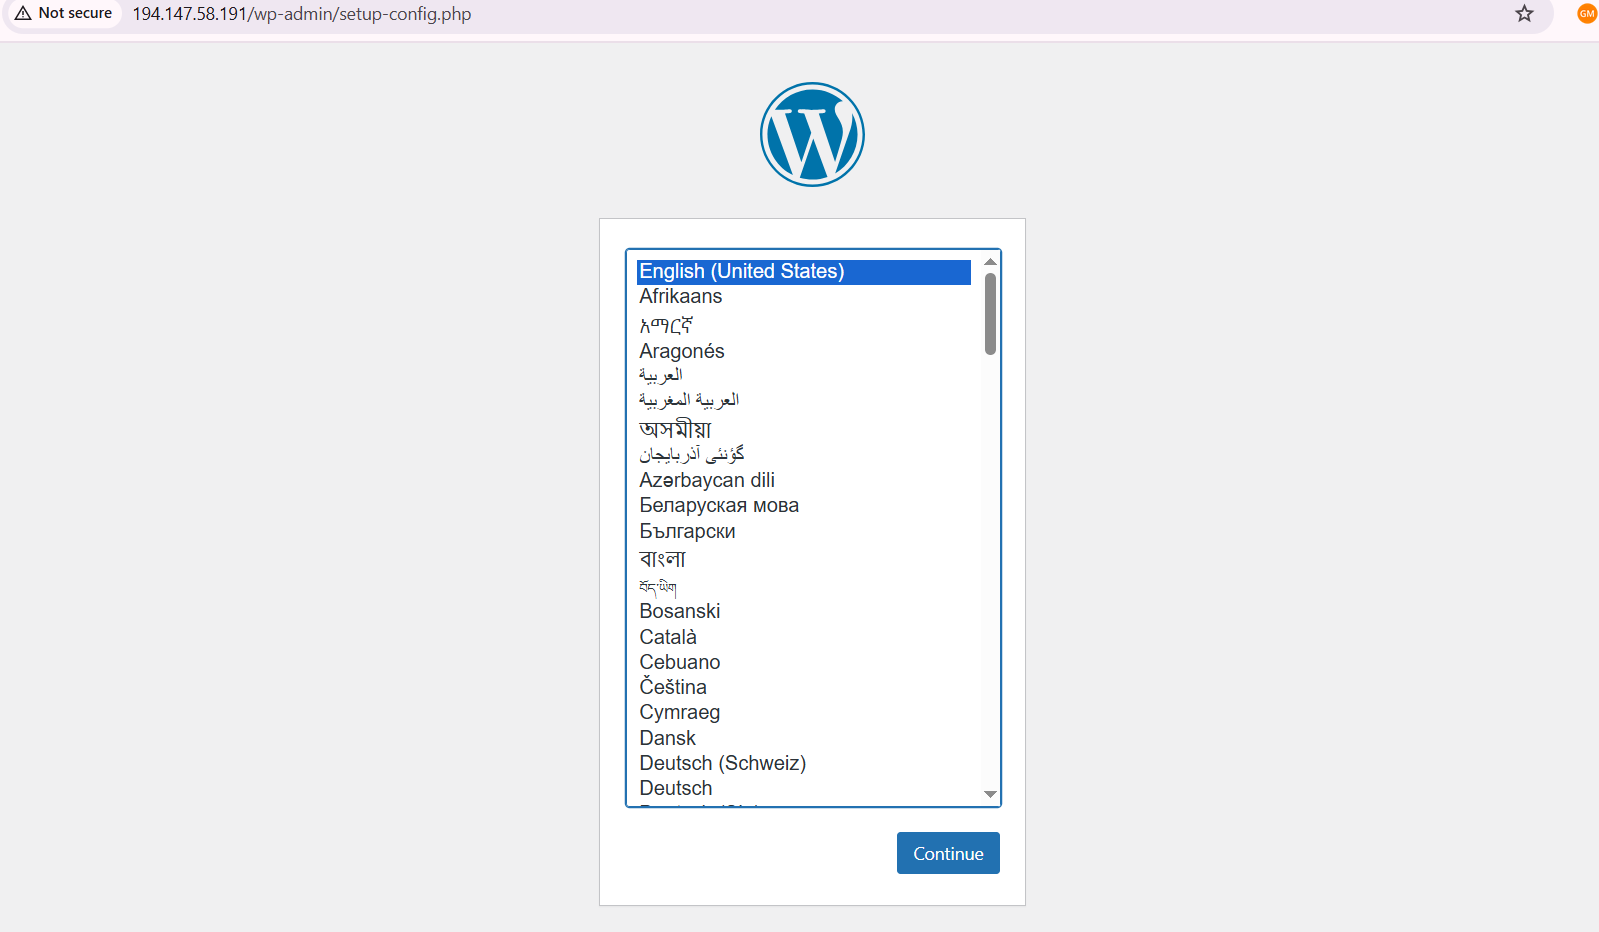
6. Download and Configure WordPress:
- Navigate to the web root:
cd /var/www/html

- Download and extract WordPress:
sudo wget https://wordpress.org/latest.tar.gz
![]()
sudo tar -xvzf latest.tar.gz (If you encountered tar command not found then install tar package using: sudo yum install tar -y)
![]()
sudo mv wordpress/* .
![]()
sudo rm -rf wordpress latest.tar.gz
![]()
- Set correct permissions:
sudo chown -R apache /var/www/html
![]()
sudo chmod -R 755 /var/www/html
![]()
7. Configure WordPress:
- Rename the sample configuration file:
sudo cp wp-config-sample.php wp-config.php
![]()
- Edit the file:
sudo nano wp-config.php

- Update the database details:
You can update these details using the commands CTRL + \ and add the text you want to replace and then press ENTER.
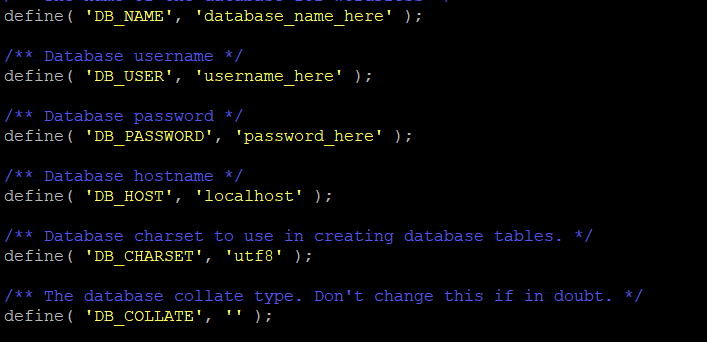
After that add the text, you want to put instead of the earlier text and again press ENTER.


Save and exit (CTRL+X, Y, Enter).
8. Configure Apache:
- For Apache, create a Virtual Host file:
sudo nano /etc/httpd/conf.d/wordpress.conf
![]()
- Add:
<VirtualHost *:80>
ServerAdmin admin@example.com
DocumentRoot /var/www/html
<Directory /var/www/html/>
AllowOverride All
DirectoryIndex index.php
Require all granted
</Directory>
<Directory /var/www/html/wp-content>
Options FollowSymLinks
Require all granted
</Directory>
ErrorLog /var/log/httpd/dynamic_error.log
CustomLog /var/log/httpd/dynamic_access.log combined
</VirtualHost>
Restart Apache: sudo systemctl restart httpd (While restarting the Apache if you are encountering some error then kindly check the syntax using the following command: sudo apachectl configtest)

Note:
You need to know that to run Apache we need to allow the port: 80 for it. Here’s how you can do it.
-
We uncommented the Listen 80 line. Run this command
sudo nano/etc/httpd/conf/httpd.confand uncomment the last line or replace it.
Restarted Apache using: sudo systemctl restart httpd
Apache started successfully!
After successfully running all the command and following all the right steps, if WordPress still not working on the browser, then,
We ran: httpd -S to check the VirtualHost configuration.
Found conflicting entries in multiple config files like:
/etc/httpd/conf.d/wordpress.conf
/etc/httpd/conf.d/linux.codetowebsite.com.com.conf
Two Virtual Host blocks were defined for the same domain/port, which caused Apache to serve the wrong directory.
So, what we did, we move all WordPress files to the actual active Document Root. What you can do is Delete or rename the conflicting file and restart the apache.